Showing posts with label Halloween Fun. Show all posts

Friday, October 21, 2011

Bean Bag Toss {last Halloween craft}

Today I am going to show you what I made for my kiddos!
It is a home made BEAN BAG TOSS!

Supplies you will need:
Fabric
Beans 
Sewing machine
A couple of buckets
Scissors or rotary blade
Iron
 Here are the supplies!
 Cut three rectangles that are 6 inches wide and 10 inches in length
 Turn inside out and sew all the way around. 
Leaving a gap to pour the beans in.
 Cut your corners,
turn right side out, 
and press with iron.  
Then fill with beans.
 This was a little tricky, I was too lazy to hand stitch this closed.  
So I just pushed all the beans to the side and sewed all the way down the seam.
 Repeat!
Then you have your very own game of bean bag toss!

Wednesday, October 19, 2011

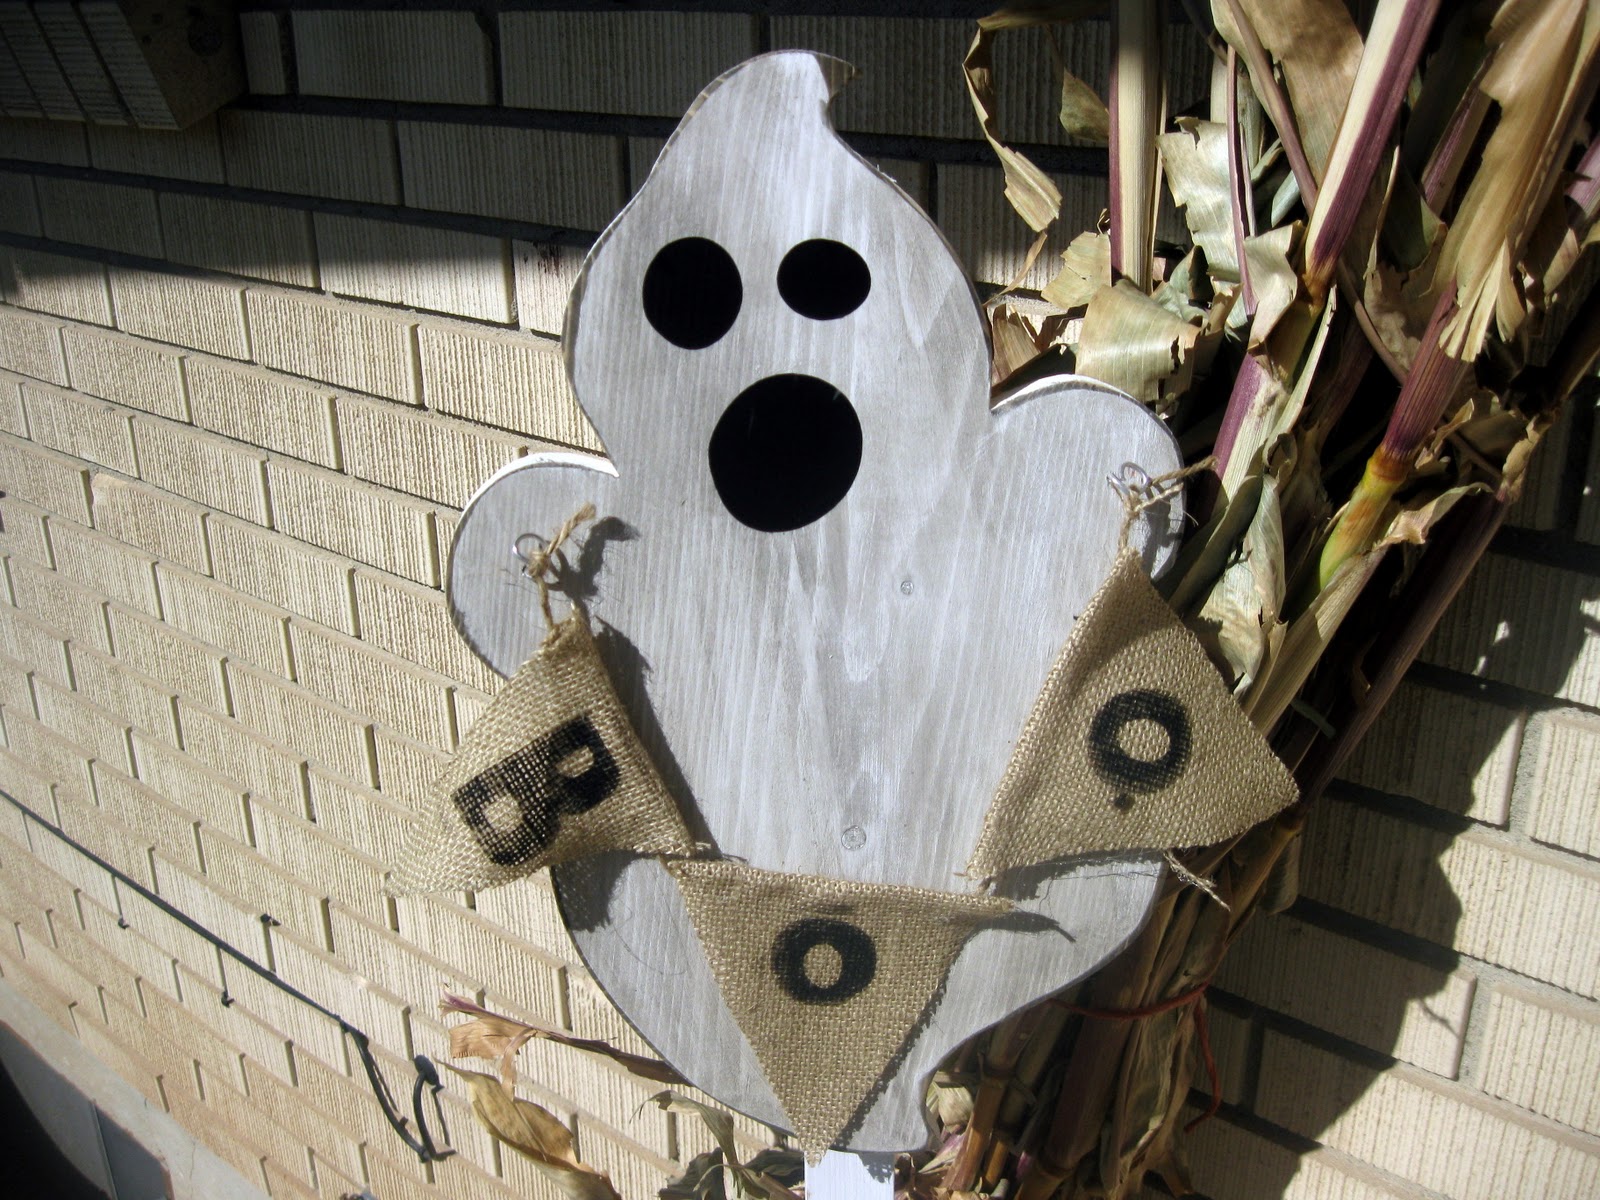
My Halloween Front Porch

I finally finished my front porch last night adding pumpkins.
I love my little ghost.
I got him at Wood Creations.
But I added his little 'BOO' banner of course!
And I think I am about done with Halloween.
Next up is Fall decor!!!
If you would like to see where I link up click HERE

Tuesday, October 18, 2011

Blast from the Past

I did a guest post for Oops I Craft My Pants a few days ago.
I thought I would share with my readers in case you missed it.
I made this guy last year.
But he was so cute I decided to give him another shout out!
And I will tell you how I made him.
Here is my how to:
Supplies needed:
Fun Fur (you can buy it at walmart)
Floral Styrofoam form.  
Wooden Dowel
Pipe Cleaners
Spider webs
Bucket
Start by wrapping the fun fur all over the Styrofoam. 
Take the pipe cleaners and cut them in half.  
Stick them into the body of the spider.
You can add a dab of hot glue to make it stick better.
 At this point you can add eyeballs to your spider.
Now onto the bucket to place your spider in.
Paint your wooden dowel to whatever color you choose.
I chose orange cause the spider was already black and I wanted to contrast.
Put a little more Styrofoam in the bottom on the bucket and place spider webs on top.
Then all you have to do is stick the wooden dowel into the spider and place in bucket.
It was REALLY easy and took about a half hour to make!


Friday, October 14, 2011

Faux Lanterns {Tutorial}


 The other day on facebook.
Blue Cricket Design had offered a 'Take and Make' project.
So on a whim I put down that I would like to do it.
Thinking that I wouldn't be picked.
I am not that lucky.
However I was actually picked to do it!
Eeeeek!!!
I was going to meet Becca from Blue Cricket Design!!!
I had to drive about 45 minutes to get there.
But well worth it!
I got a loot of supplies!
All I had to do was create a project with these supplies and send her what I had done!
Pretty easy considering all that magic right there.
This is what I came up with.
Faux Lanterns
 Here is the
'How to'

Supplies needed:
Foam board
X Acto knife
Cutting Mat
Ruler
Black Paint
Paint brush
Vellum
Cardstock
Glue Dots
Glue Tape Runner
Cut your foam board in half with the X-Acto knife. 
Then separate the board into fours.  
You won't want to press all the way through with the X-Acto knife.
Next draw out with a pencil how you want the center of your lantern to look.
Take your X-Acto knife and cut all along your lines.
Paint foam board to desired color.
Using the tape runner, glue all around the edges in the inside of the lantern.
Cut the vellum to size and secure to the inside of lantern.
With the cardstock cut our images you want to show through on your lantern.
I used my silhouette to cut these shapes.
Use the glue dots to secure cut outs on the vellum.
You will want these on the outside.
Put three or four more glue dots to the end pieces so they will stick together.
Then just sit back and marvel at just how awesome you are!


Tuesday, October 11, 2011

DIY Block Puzzle

 My boys LOVE puzzles! 
I love puzzles!
What is even better about this puzzle???
It is actually 6 puzzles!
AND you could do this in whatever theme you want! 
Think Christmas or birthday presents!
It is fairly simple.
Kinda time consuming.
But WELL worth it!

Here is my how to!

Supplies need:
Wooden blocks (I got mine at a local craft store.  But you could take a 2X2 and just cut it.
Paint
Mod Podge
Scissors, or a paper cutter
6 different prints of paper
Sanding block (not shown)

Measure out how big your blocks of wood would be together.  
Since my blocks were already cut I had to tape them together.
Cut out all your different paper. 
I always do this first before I paint.  
Gives me something to do while paint is drying.
Paint your blocks to desired color.
While paint is drying take your six different patterns and cut them into the sizes of your blocks. 
I cut mine to 1 and a half by 1 and a half.
After paint dries modpodge your paper to your blocks.  
I sanded in between patterns so that the paper wouldn't peel off and so that they would all fit together.
Then just let them fight over enjoy them!
Monster preferred to stack them. 
Then promptly had them taken from him after he decided to throw them at his brother.

Want to know where I party???
Click HERE

Friday, October 7, 2011

DIY Spiders


I made these little spiders to go on my wreath that I made last week.  If you would like to see the post on that follow the link here.  I thought I would share how I made my cute little creepy crawly spiders.  They are super easy and will take only minutes to make.  You can also make these with your kids! 

You will need:
Fun fur (I love this stuff)
Two Pipe cleaners
Googley eyes
Hot glue

 Start by rolling up the fun fur just like you would any yarn ball.
Once you have it to the size you would like cut the string and dab some hot glue and stick your end piece in it.
I swear I burn my fingers with hot glue AT LEAST once a week.
 Cut your pipe cleaners into fourths.
 Dab some hot glue to the end of pipe cleaner and press it into the side of the spider.  Try not to apply too much pressure but just enough to stick.  Then glue two googley eyes to spider and adjust legs to however you please!!
And there is the spider!
I hope you enjoy!

Wednesday, October 5, 2011

A Pinterest Craft Day

I love Pinterest, I don't know why it took me so long to jump on the bandwagon.  I was pretty wary of it when I finally agreed to have someone send me an invite.  I didn't use it for like a month.  But then I tried it out one night.  I was hooked.  BAD!  It is seriously too addicting!  But then again it gives you such fun, and awesome ideas!  Like these milk jugs found at Eighteen25.  Who by the way is just incredible!  I love their blog!

Today my sister came over with her youngest girls and we decided to do our own take on these jugs.  Now I would LOVE to post a tutorial about these but I firmly believer giving credit where it is due.  If you would like a tutorial on this fun, easy, and CHEAP craft.  Visit the Eighteen25 Blog.

OH by the way, do you like the new look of my blog????
I just had a make over by Krystal and her wonderful blog Sassy Sanctuary.

Click to see where I link!
Also Linking here... All Things Thristy Halloween Link Party

Thursday, September 29, 2011

{Fabric Wreath Tutorial}

I see all these cute wreaths around bloggieland right now.  So I thought I would just jump on the boat and make one too.  Turns out, I really like my creation.  It is a little different since I used fabric for the wreath.  It was pretty simple too.  I have seen on Pinterest buying foam plumping pipe stuff at the home improvement store for .97.  It will seriously make two maybe three wreaths.  But the possibilities are endless with it!

What you will need: (for the wreath itself)
I used a piece of fabric that measured 5 inches wide by 40 inches in length.
The foam pipe stuff... (I am so technical I know!)
Sewing machine
Duct tape
First I ironed down the ends of my fabric to keep it from fraying.
 I then sewed both side down.
Fold the fabric in half right side facing each other and sew all the way down.  Remember to back stitch!
Turn the fabric out and you should have a nice little tube.
Here where the foam pipe comes in.  Slip the fabric onto the pipe and once that is done simply just cut the pipe with a pair of scissors.  Really easy to cut.
Use duct tape to hold the pipe together.
Then just cover the pipe with the fabric.
Viola!!!  Insta wreath!!! 

Linking to:

Wednesday, September 21, 2011

My Spooky Halloween Ladder


I have seen these ladders alot lately.  At craft stores, and the Quilted Bear (for those folks not in Utah its like a consignment store for already made crafts).  
But the price tag on them is something to be desired.  
So of course I thought 'Hey!!!  I can make that!  I few boards some screws and there we are' 
 My oldest the trouble maker loves this.  I think he gets the love for Halloween from his momma.
The pictures aren't so great.  We have really bad lighting in our house and most of our walls are white.  We rent so what can you do.


If anyone wants a tutorial I would be happy to make another since I was lazy and didn't grab my camera while making this!!!

Linking to:
Simply Designing
Along for the Ride
Tatertots and Jello
Sew Can Do
Running with Glitter
Blue Cricket Design
Lil Luna
Night Owl Crafting
Somwhat Simple


LinkWithin

Related Posts Plugin for WordPress, Blogger...